How To Remove a Stuck Chuck
![]()
In most cases, the spindle nose of a lathe falls into one two types: threaded, and cam-lock. Both provide excellent registration between repeated removal and fitting. Cam-locks are available in a number of standard sizes. They are heavy, and expensive. In contrast, threaded nose chucks are lighter, and cheaper.
") |
 |
") |
 |
The main advantage of the cam-lock over the screwed variety becomes apparent when the lathe is run in reverse. The cam-lock remains locked, while the screw-on type is in distinct danger of unscrewing under load with disastrous consequence. Another disadvantage of the screw-on type is they can be hard to unscrew, while the cam-lock will always release easily. Generally, smaller lathes like those most likely to be found in a model engineer's shop will be of the threaded nose variety, so this page looks at the ways such a chuck can be removed.
How Chucks get Stuck
Before we start, it would be a good idea to review the Tech Tip from February 2004 which relates how a chuck can become well and truely stuck. Another stuck-chuck tale of woe appeared in one of Guy Lautard's Machinist's Bedside Reader series. In this story, the chuck was so stuck, the only cure was to turn away the chuck backplate and screws to remove the chuck, then carefully machine away the remains of the backplate from the spindle nose, then turn up and fit a new backplate before the boss arrived in the morning.
But any operation that places a heavy load on the tool will have an effect like applying a wrench to a nut. Parting off steel, or taking heavy roughing cuts—the sort that turns chips blue—will do the trick. It's even worse if you've had a tool "dig-in" for some reason. The load is less with softer metals like aluminium and brass, but even they will cause the chuck to tighten, especially if the stock diameter is large.
I'm told on good authority—in other words I've not tried this myself—that placing a thin paper washer between chuck and register face will prevent the chuck locking up tight enough to need anything but gentle pressure to break the lock. One reader told of his ealy apprenticeship with weeks spent making such washers from brown paper. Another quoted this as standard practice in the Royal Navy shop where he trained. I always fit a paper washer under my Myford-Dixon quick-change toolpost to improve friction, so it makes sense.
Precautions
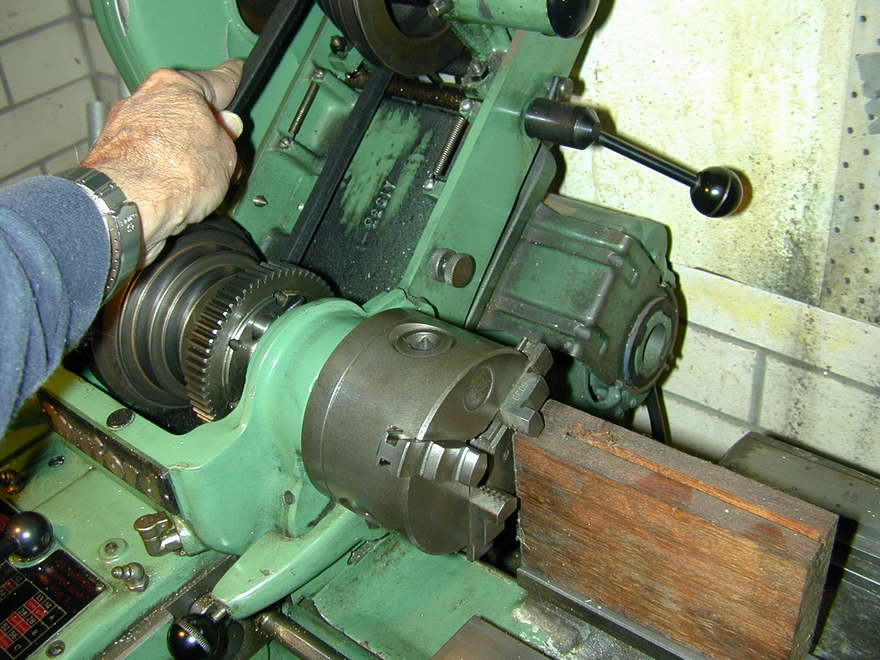
I've found that if you have cleaned the chuck register, thread, mandrel nose, and oiled the nose thread before screwing up the chuck firmly onto the register, it will often screw off with hand pressure only provided you have only done light work (and I am no 600 lb gorilla, I assure you). The photos here show the standard chuck thread cleaning gizmo—mine hand-made from a piece of bike spoke—and the nose being oiled. You need to be very careful that there is no swarf or dust on the registers, and when not fitted to the lathe, always rest the chuck register side up on the bench so the register is not damaged.
 |
 nose threads and register") |
If strong-arm torque is not enough, there are other ways, described in ascending order or brutality below, plus a brilliant method that I'll save for last. All but the Stand Back... depend on you being ably to lock the lathe spindle. Simply placing it in back-gear will probably not be enough; a robust lock is required (the Myford ML-7A used in the photos has a retractable pin that engages in a hole in the stepped belt pulley).
Quick and Brutal
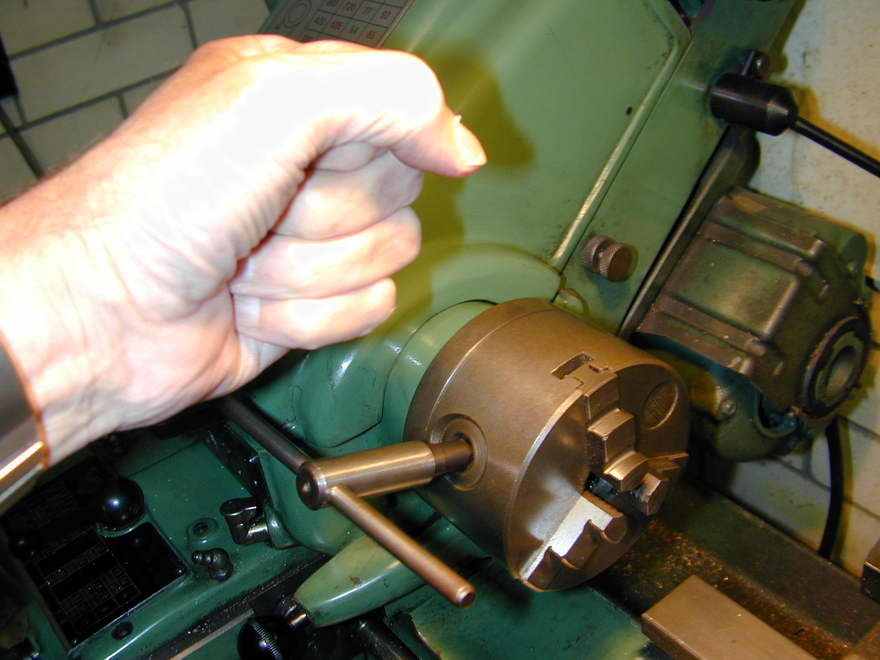
First, easiest and least desirable, we can use the chuck key as a knock-off stop like the wheel nuts on an old MG. This can place damaging stress on the chuck key socket used, but provided you never use anything heavier than your fist, it's safe enough; don't be tempted to reach for a hammer, not even a plastic one. Normally, I'd place my left hand over the key, then bang the top of my left hand with my right fist. This spreads and softens the impact area, resulting in less pain. The photo was posed and I needed my right hand for the camera, sorry. If it does not come loose with a couple of bangs, move on to the next before you do yourself damage.
Quick and Gentle
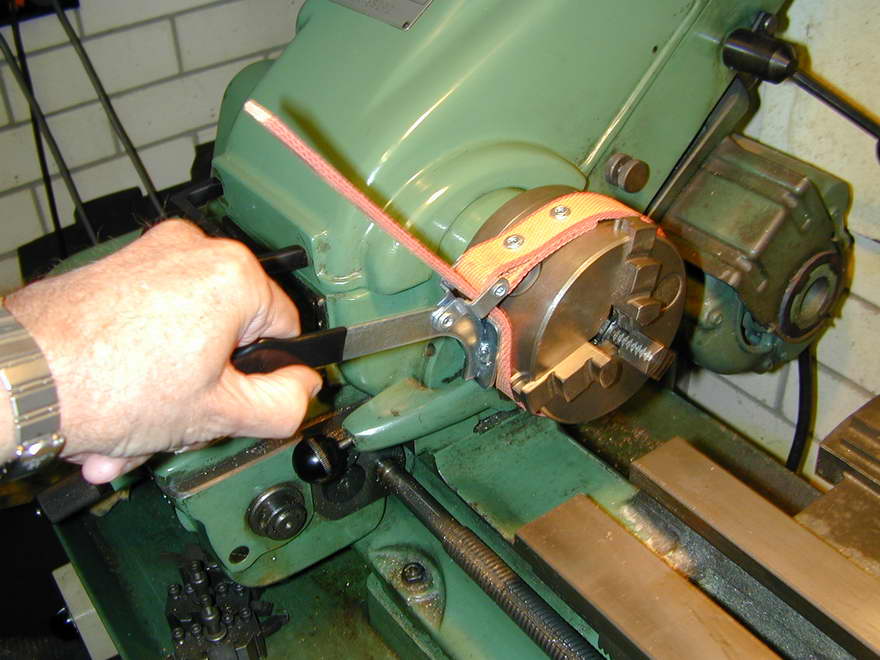
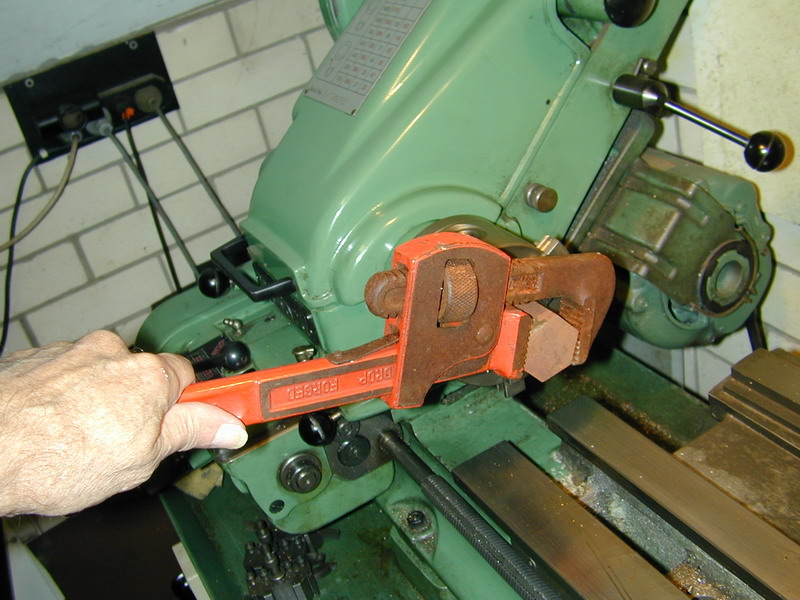
Here's the strap wrench in use. I'm a bit new to this tool, having only just got it a few weeks before writing this page, but a couple of uses suggest it is capable of applying quite a good amount of torque. Best of all, the torque is applied in a totally safe way that cannot cause any chuck damage. You can also use the tool to unscrew those stubborn screw top jars and oil filters. On our stuck chuck, at worst, it will slip, then it's on to one of the Sure-Fire... methods, or the Stand Back... one if you are terminally brave beyond all help, counsel, and redemption.
Sure-Fire and Dangerous
Who said give me a lever long enough and I'll move the world? Bit unlikely and all Greek to me, but with a long enough lump of old steel, you can certainly move the most stubborn stuck chuck, or destroy it, or snap off the spindle lock. This way is rather unkind to your chuck as, depending on the length of the lever, you are imparting considerable torque via the legs of two of the chuck jaws and the T slots in the chuck body. This can damage or break the jaws, slots, or both, and the further the jaws are out from the center, the greater the chance of an expensive noise. That said, this way will break even very tight locks, but use with restraint and don't blame me.
Faceplates Too
While the Sure-fire lever method can damage a movable jaw chuck, it's the bees knees for a stuck faceplate. Just put a couple of decent diameter bolts through a pair of opposed slots at the outer ends, insert the lever, and tug. If the faceplate has no slots—a plate with a driver pin for between centers work for example—A sharp tap on the drive peg with the plastic tipped mallet is a safe and sure method; those drive pins are tough!
Slightly Less Sure-Fire, Slightly More Dangerous

Here's a variation on the previous method where we apply a decent size crescent wrench to one of the chuck jaws. Even though the force is distributed of the entire length of the jaw, we are concentrating the abuse on a single jaw and T-slot, so I rate this as a bit more severe than the last, even though it has the dubious advantage of convenience as we don't have to locate a big, rusty, steel bar. It's ok if the chuck is not too tight, but if it does not want to come easily, don't force it or you may be sorry.
Stand Back and Prey
This one comes from two well respected lathe texts and does not need a spindle lock. The idea is to place a block of wood on the rear bed ways, then rotate the chuck so that one jaw is a short distance above the top of the block. Bradley[1] says place the lathe in slow back gear and pull on the belt. South Bend[2] go a step further, saying start the lathe in reverse and drop the clutch. The spindle (and chuck) will accelerate for a few degrees, building up momentum until the jaw hits the block.
The idea is that the impulse shock will break the thread lock... provided the jaw does not break off... provided the corner of the bed way does not break... provided the chuck does not completely unscrew and drop onto the bed causing even worse damage. As an absolute beginner and under the influence of the aforesaid respected references, I have actually tried this. It worked, but the experience frightened me so badly, I've never done it again and include it here for completeness only. I really, really don't suggest ever using this approach, especially on a geared head lathe!
Why Didn't I Think of This? (Totally Sure-Fire)

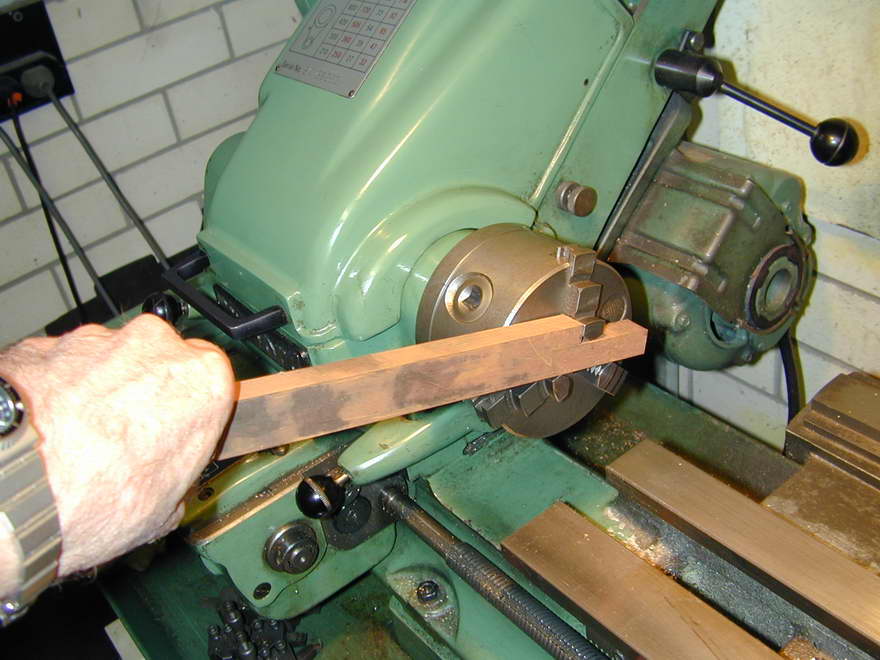
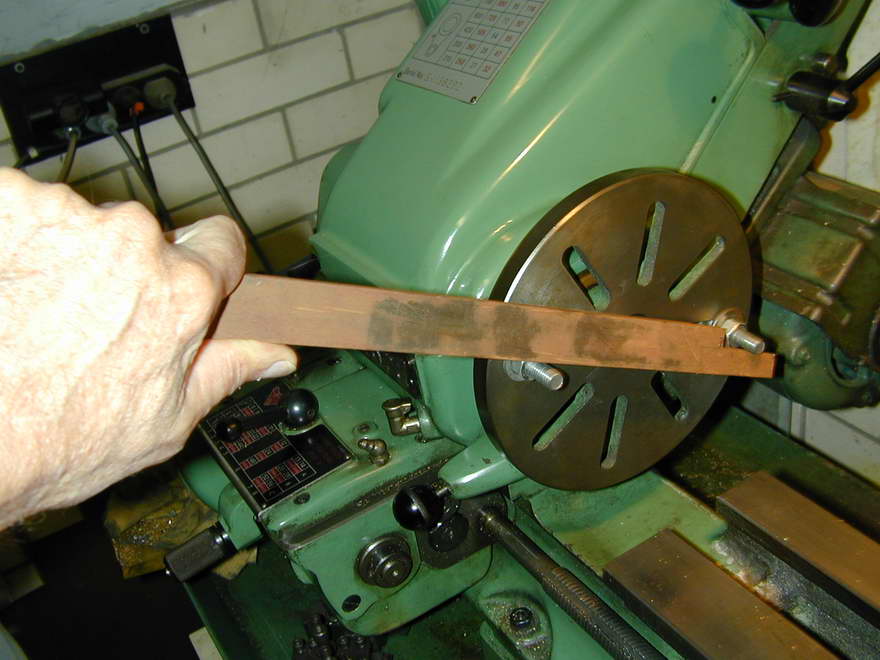
And finally, the most gentle and reliable method you can imagine! This idea came from a MEN reader after the first version of this page was released. Like the strap-wrench picture in MEW that sparked this whole investigation, the pictures tell the entire story. Keep an offcut of decent size hex steel in the drip tray. To remove the chuck, pop it in and tighten up, then apply a decent size wrench. The load applied to the chuck jaws is exactly the sort they were designed to take! My Stilson may be overkill, but this will budge that stuck chuck safely, for sure!
Why Doesn't Someone Make These? (Totally Sure-Fire)
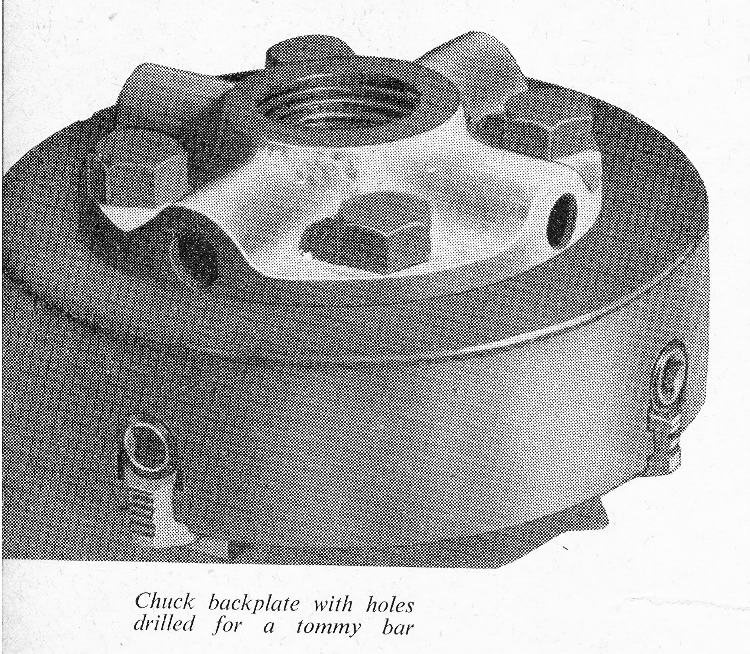
Will it ever end? Every time I think we have plumbed the depths of stuck chuck remedies, I find another. This one, by Mr HH Nicholls, appeared in Readers' Hints section of the Model Engineer for October 4, 1956 (p482). As usual, the picture does all the explaining required. I've never seen a backplate like this, though it would be very little effort for suppliers of castings to the model engineering community to have a pattern like this made and castings produced. The downside today—as opposed to 1956—is that it requires precision machining. At one time, lathe owners were expected to machine their own backplates to mount their chucks. Today, they are ready mounted, or at the least, ready-turned and threaded backplates are used. Not that finishing a backplate should be beyond any competent model engineer, it's just no longer "normal". Good idea though and pity it never caught on.
Conclusion
We've seen how threaded nose chucks and faceplates can become stuck, especially if we are not careful about spinning them home firmly and keeping the registers absolutely free from foreign matter and well oiled. We've then looked at all the methods available to us for getting the chuck loose. Of all of them, the strap-wrench is the safest, although it may slip on a really stuck chuck. If you don't have a strap-wrench, the chunk of hex steel in the jaws just can't be beat, provided you have a decent wrench handy. For very light locks, you can abuse the chuck key, provided nobody is looking and the chuck is not too tight (I've heard this is a sacking offence in some shops). Failing those, you are going to have to apply a lever of some sort. We also looked at a method advocated by two respected texts that scares me witless. As the man said, you pays your money and you takes your chances, but if you can't find an approach that appeals to you here, you are probably a lost cause... Good luck with the stuck chuck.
References:
![]()

This page designed to look best when using anything but IE!
Please submit all questions and comments to
[email protected]
Copyright (c) Ronald A Chernich, 2010. All rights reserved worldwide.