Making and Using a Basic EDM
Page 6: Conclusions and References
Created: 2006-12-19
Updated: 2007-01-26
Updated: 2011-07-07
Click on photos to view them in more detail
As a broken tap remover, the EDM is perfect for the job. Like all tools, you will have to learn how to use it. Time spent experimenting with different electrode types and sizes will be well spent. I'm confident that the machine could remove a sheared 10-32 stud from a Myford-Dixon tool holder down to a broken 2-56 (8BA) tap without damage to the surrounding thread. The secret—if such it is—lies in the precision of the ram, rigidity of work and electrode, and high volume flushing. Very limited experience highlights a few preliminary conclusions:
One solution—more of a work-around really—found in commercial units is an additional control in the electronics that retracts and parks the head after a pre-set time. The operator can then leave the process unattended, periodically checking progress and monitoring only the final burn. Such a system would not be difficult to design and retro-fit to Ben's design.
Some web research suggests that a substance known as IME-MH made by IONOPLUS is widely used for EDM work in First-World countries (which I contend Oz is most demonstrably not). This is a fluorescent green synthetic, safe for humans, specially formulated to assist the EDM process by protecting the electrode and distributing the discharge through "satellite electrodes", providing a lower machined surface roughness (they claim). Readers living in the UK or the Continent should have no trouble obtaining this stuff, although obtaining it in small quantities may be a problem.
A MEN reader emailed to let me know about a product called "Electrocut 5", which made by Fuchs Lubricants (Australasia) Pty Ltd. It costs about $120 for 20 Litres including delivery, so ts is comparable to kerosene but is reported to be a lot safer and easier to work, and totally kind to your hands. I have not verified, this, but is is on the list for the next time I do a serious EDM job.
Setup
Rigid mounting and precise ram movement have been stated as essential for accurate work. Of equal importance is alignment of work and electrode. Being able to use something like the X-Y mill table for this is essential if you intend to preserve the surrounding thread. And even then, something better than the Mk 1 Eyeball would be highly desirable as an aid to alignment, especially at smaller sizes.
Fluid Management
While workable, my tank setup suffers from not having a way to quickly and easily drain away the fluid. The system described in the book, or something very like it, is just about essential for more than casual use. The Oriental suds-pump will cease to suck when the level drops to about one inch deep. If the pump's impeller base could sit in a circular, close fitting sump, that would be an adequate alternate for emptying, but you are not going to find any ready-made container vaguely like that.
Depth Control for Blind Machining
Estimating progress, especially on a blind burn, is very difficult and I don't immediately see any practical solution to this. A calibrated movement indicator on the ram is not going to help at all as the electrode is wearing away while the ram is lowering, meaning that the ram position and the machined depth are not related except in the very broadest sense. All one can do is to periodically, based on experience with burn rates, stop the burn, raise the ram, lower the fluid, and try to insert a depth gauge in the space allowed between raised ram and work. If you remove the ram assembly, you'll have to setup all over again. All in all, this machine cannot be left to do its thing unattended.
Limit Control for Thru-machining
As described and built, unattended operation is not a good idea. For thru-holes, the machine could easily complete the job and merrily start on the fixturing plate without you knowing it. An adjustable limit switch that remotely actuates a latching relay across the "Raise the Ram" button would be easy to fit, but again we have the problem of where to set the switch to account for the required work depth and electrode wear. Perhaps experience and careful workshop notes would help, but overall, I'd say you will just have to stand there and watch the thing.
Electrode Erosion Rate
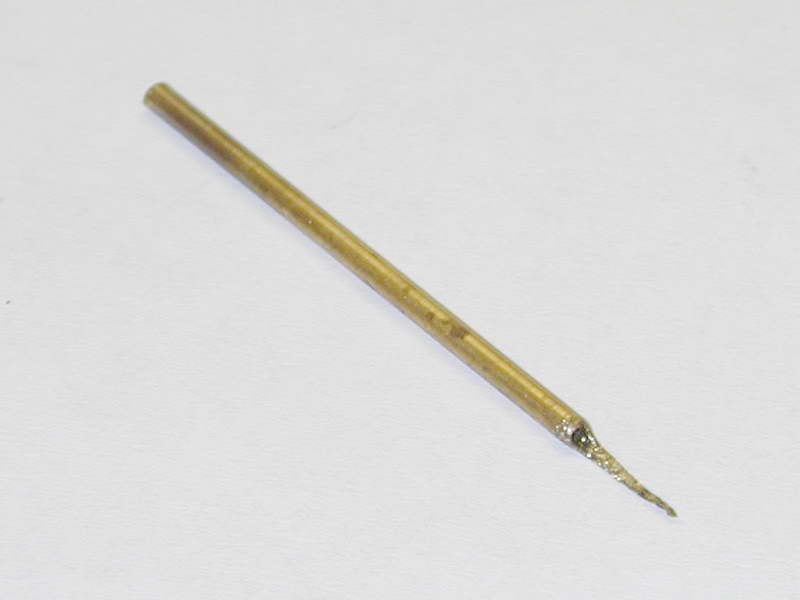 Tests show that the rate at which the electrode erodes depends on what it is burning into. For example, the brass tube electrode eroded much faster against the steel tap than the aluminium it was screwed into. This means that if you are sinking into two dissimilar metals, the electrode may erods away assymetrically and your hole will be deeper in one than in the other.
Occupational Health and Safety
Can I begin to tell you how totally unpleasant it is spending a few hours continually plunging your delicate, pink hands in and out of a kerosene bath? All the electrical violence occurs under the surface where there is no oxygen to permit combustion to take place, so using kero for the electrolyte is relatively safe. But accidents can still happen, so have a oil type file extinguisher handy. The process also found all the little nicks and scratches in my skin that I didn't know about, and I'm still feeling them two days later. A more operator friendly electrolyte seems highly desirable. Some web research suggests wire erosion machines use de-ionized and de-mineralized water. This most definitely is worth closer investigation although the thought of immersing one of my small milling vices, or rotary tables in water holds negative appeal.
Conductivity
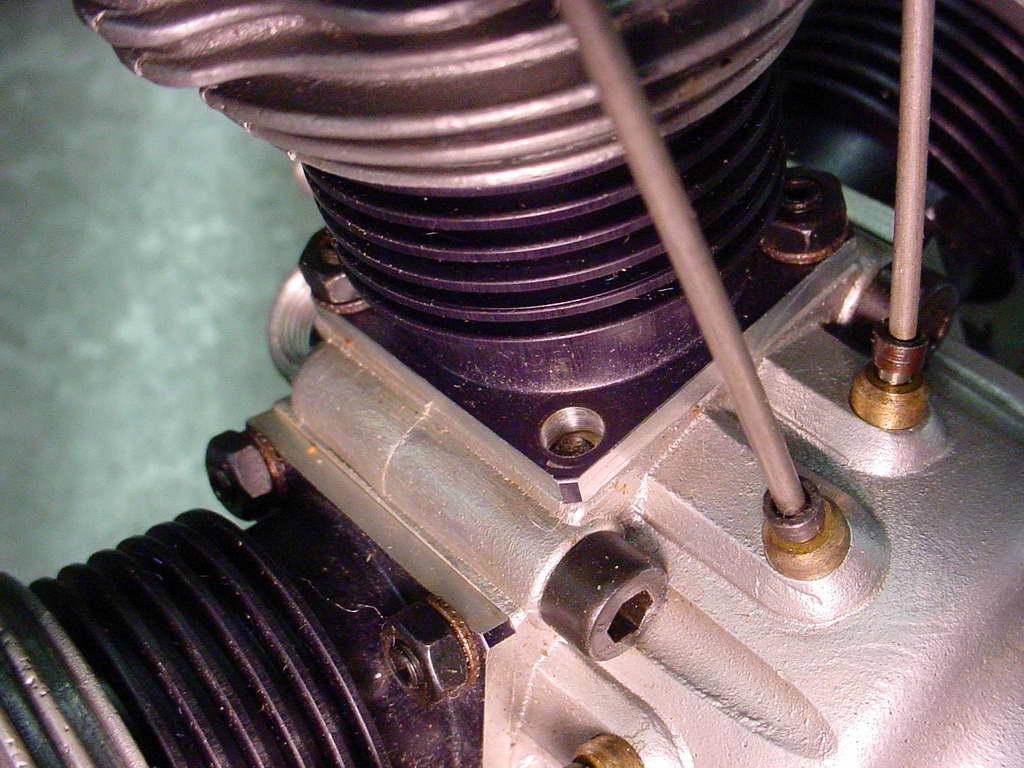
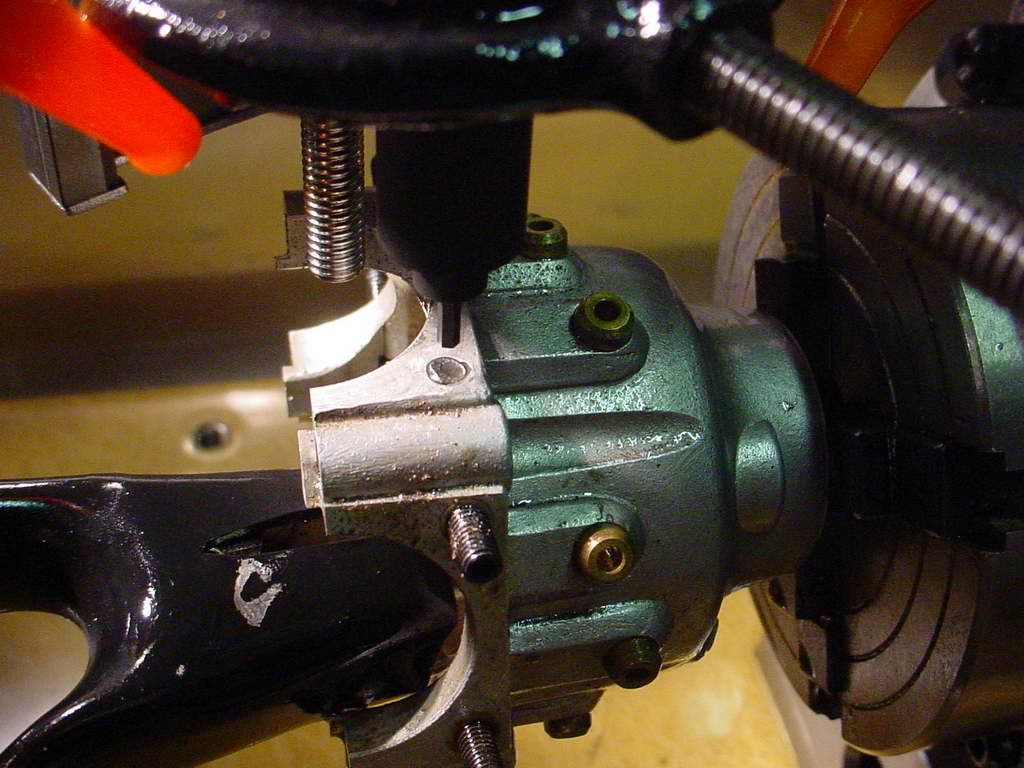
The E of EDM stands for electrical, so if you don't have a low resistance path between the generator output clips (ignoring the air gap), the bacon won't fry! The pictures below show a job Nick Jones applied his Flemming EDM to: the removal of a sheared cylinder stud in the forward crankcase section of his Sidel five cylinder radial (Nick bought the engine this way—he's far too experienced to have done this to himself). The job should have been straight-forward, but the arc just refused to form.
 |
 |
 |
Suspecting something odd with the stud, Nick applied a Megger accross the stud and case. In my day, this was a hand cranked high voltage generator with a meter that related the Megger output to resistance. The faster you cranked, the higher the voltage. So the idea was to slowly increase the cranking speed while watching the reading. Eventually, the needle would drop down as the voltage overcame the insulation. The highest reading was the resistance (or reluctance in "Mhos" which is Ohms spelt backwards). Meggers could also be put to less official and benign uses, but I digress...
In Nick's case (bad pun), the Megger indicated 1.2 Megohms between the studs and the base material. The studs had been locked into the case with a thread-locking compound that had spread as a thin film completely insulating the stud. How likely is that?
Quite likely is the answer. The solution in Nick's case was simple. The stud holes had been thru-drilled and tapped so he was amble to insert an M4 screw from the inside of the case to contact the stud and provide a low resistance path. Next he used a 2mm hex graphite electrode to burn a 2,5mm hex socket into the stud. The stud and case was warmed with a hot-air gun, then an Allen key was unscrew the stud with no further problem.
Conclusion
I'm reluctant to total all the bills, but I suspect this gizmo cost about A$500, even with Nick Jones' generosity. While this seems expensive to deal with a single broken tap, it has "saved" a project with hundreds and hundreds of hours invested in it. An equivalent commercial machine would cost over AU$8,000. On the plus side, broken taps and screws with the heads twisted off are now a mere inconvenience, not a disaster. The capability of the device is yet to be explored, but I can already see it used to turn pilot holes into perfectly "D" shaped transfer passages in Oliver ported cylinders and to make keyed prop drivers like Fox and the Frog 500. I'm sure other applications will emerge too.
RS Components Shopping List
| RS Stock No. | Qty | Unit Price (A$) | Description |
| 417-9661 | 1 | 78.30 | Motor, epicyclic geared, 12v, 100:1 |
| 252-6245 | 1 | 80.80 | Resistor, fixed, wirewound, enamelled, 10 ohm, 100 Watt |
| 839-094 | 1 | 17.10 | Capacitor, aluminium, long life |
| 227-8485 | 1 | 6.62 | Diode, bridge rectifier, KBPC602 |
| 805-316 | 1 | 38.20 | Transformer, frame mount, 2x24v, 100VA |
| 804-874 | 1 | 12.70 | Transformer, clamp mount, 2x6v, 6VA |
| 313-564 | 1 | 81.40 | Meter, panel, Analogue, moving coil, 100v |
| 223-988 | 1 | 83.00 | Enclosure, grey, metal, equipment housing, 280x203x133 |
| 380-6069 | 1 | 47.50 | Fan, AC, sleeve bearing, Sunon, 80x80x25 |
| 232-487 | 1 | 10.50 | Connector, test, terminal post assembly |
| 365-7520 | 4 | 29.82 | Capacitor, polypropylene, metallised |
| 410-227 | 1 | 7.73 | Potentiometer, Cermet, 12mm, 1.0W |
References
| [1] | Fleming, B: The EDM How-To Book, Fleming Publishing, USA, 2005, ISBN-0-9767596-0-8. |
| [2] | Michell, D; Smith, P: A Simple spark erosion machine, Division of Tribophysics, CSIRO, University of Melbourne, Australia, 1970. |
| [3] | Rawlinson, P: Mk.3. Wire Eroder (1), Model Engineers' Workshop, Issue #95, Dec 2003/Jan 2004, Highbury House Publishing Ltd, England, p38. |
| [4] | Oakes, G: A Simplified Spark Erosion Machine, Model Engineers' Workshop, Issue #104, Feb/Mar 2005, Highbury House Publishing Ltd, England, p43. |
| [5] | Rumbo, E: A Simple Spark Erosion Machine, Model Engineers' Workshop, Issue #117, Highbury House Publishing Ltd, July, 2006, England, p51. |
| [6] | Rawlinson, P: Spark Eroder Dielectric, Model Engineers' Workshop, Issue #68, October 2000, Nexus Special Interests Ltd, England, p36. |
![]()
| Back: Operation | EDM How-To Index |
 Model Engine News Home
This page designed to look best when using anything but IE!
Please submit all questions and comments to
[email protected]