MATE Building Instructions - Page 4
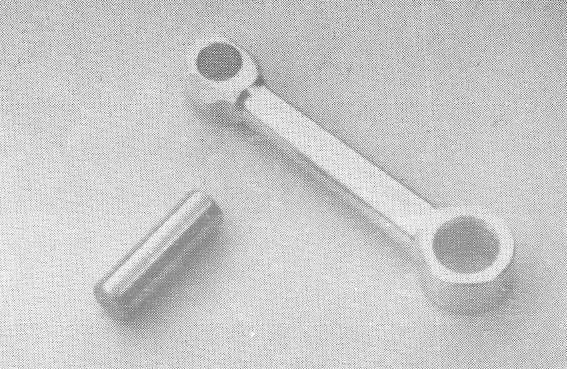
CONROD (3-1)
- Centre the Ø3/8" aluminium stock and extend 50mm from the chuck jaws. Face the end. Centre-drill and drill Ø1.3mm x 5mm deep hole. This is used for the tailstock centre support during machining, later becoming the oil-hole in the big-end bearing. Bring up the support now. Finish turn to Ø9mm up to chuck jaws.
- Use the tip of the 45° chamfer tool to scribe lines around the work at the following absolute measurements from the faced end (Omm) - 4.5mm, 9mm, 29mm, 32.5mm and 36mm.
Return the tip of the 45° tool to Omm and plunge cut to a depth of 2mm. Plunge cut again at the 9mm mark to a depth of 2mm.
Traverse the tool tip to the 29mm mark and plunge cut to a depth of 2.5mm, repeating again at the 36mm mark. Still using the 45° tool, turn down the shank between the 9mm and the 29mm marks to the 2mm depth, leaving a parallel shank of Ø5mm.
- Set the topslide over at slightly more than 1° and taper the shank from Ø5mm at the 9mm mark to Ø4mm at the 29mm mark.
- Using files and a minimum of swearing, round the big-end of the conrod into a Ø9mm ball, being careful not to touch the 4.5mm mark. Leave the little-end alone for the time being. Part-off the conrad at the chuck jaws, leaving a Ø9mm spigot attached.
- Clamp the conrod in a machine vyce mounted on the milling machine, ensuring that its (the conrod's) axis is parallel to the table traverse. Use parallel packing under the conrod to ensure it is lying precisely at 90° to the spindle axis. Centre the spindle axis over the conrad axis and clamp the table. Using an endmill, machine a flat at the same depth on the side of each end of the conrad. The final cut should just touch the Ø5mm shank at the big-end. Do not cut into the spigot at the little-end.
- Remove the conrod from the vyce and re-clamp securely with the flat side facing down and resting firmly on parallel packing. Mill the uppermost conrod ends flat down to the Ø5mm shank.
- Centre the machine spindle in line with the 4.5mm mark, which should be just visible at the sides of the big-end. Zero the dial and lock the table. Centre-drill and drill the big-end journal Ø4.9mm and then ream it Ø5mm. Cut the 1mm wide chamfer with the 45� tool held in the chuck, or instead use a centre-drill. This relief provides clearance for the crankpin radius.
- Without altering any other setting, traverse the table precisely 28mm, bringing the spindle over the little-end of the conrad. Centre-drill and drill this end Ø3.9mm and ream it Ø4mm. You should now have a conrod whose journal axes lie on the same plane, are not twisted and are parallel to each other - all essential factors.
- Return the conrod to the lathe, centreing it on the Ø9mm spigot. Bring up the tailstock support and finish turn the little-end to Ø6.5mm. Part the conrod off the spigot at the 36mm mark. Use the Ø4mm reamer to clear any burrs just raised in the little-end bore.
WRIST PIN (3-3)
- Centre the Ø4mm silver steel stock and extend 3mm. Face end, radius and polish with #800 paper or similar. Extend again 17mm from chuck and polish OD with Brasso or similar. Part off at about 13.5mm from polished end. Measure overall length and note amount to be removed to reduce this to 12.9mm. Protect finish with paper and centre again, extending 3mm. Face off excess length and radius/polish end as before.